General
Description
Here is a short video introducing the OPEN-CNC-Shield:
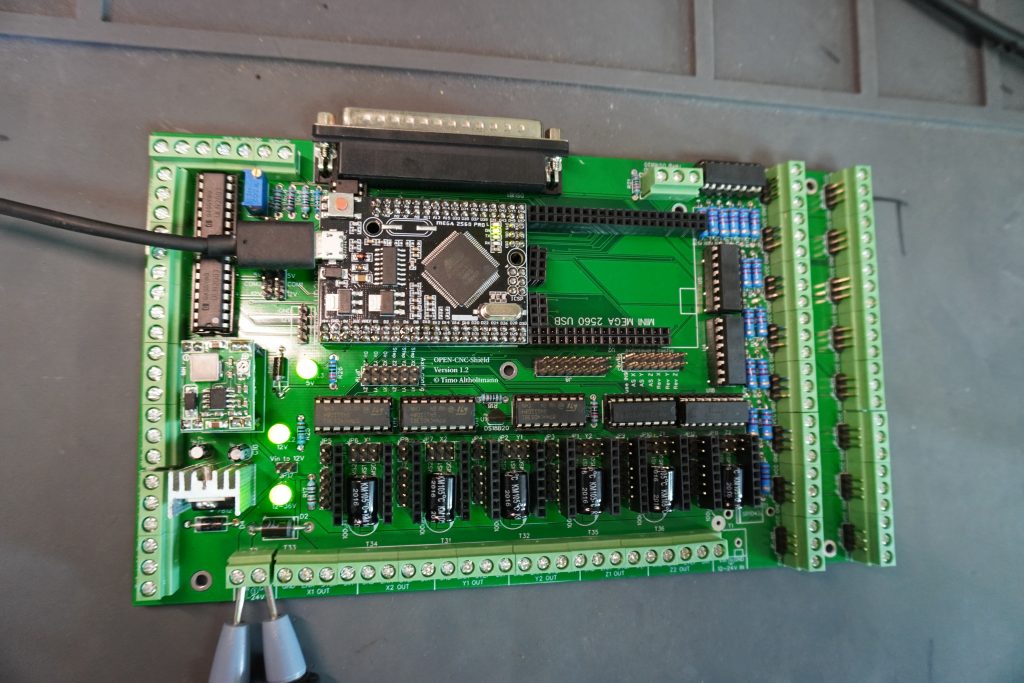
The OPEN-CNC-Shield is another CNC-Shield. It should work for beginners, who initially work with DIY milling machines and plug-on drivers, as well as for advanced users with external drivers. It is also a good idea to start small at first and upgrade bit by bit without having to buy a new shield every time.
“OPEN”, because it should be easily expandable with various interfaces. Furthermore it offers a lot of possibilities for customization, see the list of functions. It also combines the Tillboard with the Tillboard Extension, so that you only need this one board for all the functions.
Multiple softwares are possible. It can be used, among others, Estlcam, LinuxCNC or also Mega GRBL to use, for example, LaserGRBL in combination with a laser instead of a milling cutter.
Functions
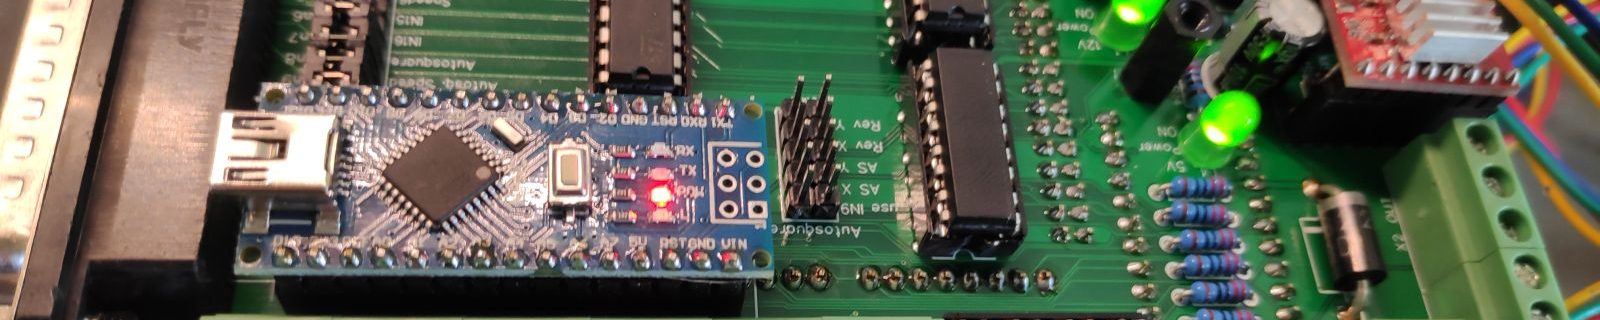
- Two Arduino Mega pro mini for control (optional, depending on what you want)
- One is connected directly to Estlcam or the PC GRBL for e.g. laser or operation by Estlcam possible.
- The other Arduino controls the functions around it and can be freely programmed. 6 axes could be moved, whereby each axis has a motor.
- Control of up to 6 individual stepper motors
- For the operation of Estlcam, the axes can be connected via jumpers, so that two motors per axis (x, y, z) can be controlled
- If you want to use other software that supports more axes, you can do this by not setting the jumpers. Then theoretically 6 axes could be moved, where each axis has a motor.
- LinuxCnC capabilities
- If you want to use LinuxCNC you can remove the Arduino and plug in an adapter board. Then two LPT/Parallel Port connectors are available for use with LinuxCNC
- The following functions are then available in LinuxCNC:
- Moving of 4 individual axes
- Spindle On/Off
- Spindle speed
- Enable the drivers
- Output 1-4
- Input 1-16
- Potentiometer for spindle speed
- Potentiometer for feed rate
- Stepper drivers can either be plugged in (A4988 or DRV8825) or external drivers can be used
- Each driver/axis connector can be provided with its own end stop
- Autosquaring can be activated for all axes (X, Y and Z) individually
- This should ensure squareness. This is especially useful on self-made CNC milling machines like the MPCNC. Here is a video with explanation: MPCNC – Autosquare
- Output of the Autosquaring status via display possible
- Onboard temperature sensor, which can be used to control a 12V fan depending on the temperature
- 12V fan connector (PWM – 4 pin)
- Here you can connect either a 12V PWM fan
- or a 12V 3 pin fan
- or a 12V 2 pin fan
- 12-24V current input
- 8 outputs, which can be switched with either 12V or 5V. Alternatively you can provide voltage yourself. Here always 4 pieces switch with the same voltage. For example: Output 1-4 with 5V and output 5-8 with 12V.
- 16 inputs. At each input can be controlled by a jumper, like these switches.
- Either by applying GND to the input,
- or by applying a voltage between 5V and 24V
- output for spindle speed and spindle on/off(laser is also supported)
- Jumper configurable to output a PWM signal, or an analog signal between 0-5V or 0-10V
- input for one or more external temperature sensors
- SUB-D 37 output for connecting a control panel
- This can be connected either by cable or by radio
- By using a second, freely programmable Arduino, for example, the following possibilities arise:
- Time-controlled control of relays
- Reacting on events
- Switch suction on when spindle motor starts and let it run for 30 seconds after it has started
- Switch cooling on when spindle motor runs
- Play the Super Mario melody on a loudspeaker when the milling program starts
- Control of coolant systems / lubrication etc.
Technical data
| Input voltage | 12-24V (24V recommended) |
| Input current | Two terminals with max 10A per terminal. When using external drivers a 3A power supply should be sufficient. When using plug-on drivers 10A should be sufficient. |
| Outputs | 8 outputs with 5V or 12V or self applied voltage. 4 pieces are always operated with the same voltage. Example: Output 1-4 with 5V and output 5-8 with 12V. In the 5V net a maximum of 3A is available, whereas the onBoard components already need about 200mA. If an external control panel is connected, this will increase even more. In the 12V net a maximum of 3A is also available. Per output a maximum of 500mA current may flow. Always work with relays, if more current is needed. |
| Inputs | 16 inputs Switched either with positive voltage between 5V and 24V or with ground(GND). Selectable by jumpers for each input. |
| Ports | – Connection terminals for 6 external drivers – SUB-D 37 Connection for external panel, joysticks, handwheel etc. – 4Pin 12V PWM fan connector – DS18B20 Temperature sensor – Spindle On/Off – Spindle speed (PWM / Analaog 0-5V or 0-10V) |
Procure board / components
If you don’t feel like getting the board and components yourself, here is a small for order form: https://forms.gle/eGtfc3Autmp8chfd6
Board
Gerber and project files can be downloaded from Gitlab Repository
I recommend to produce the board with a copper weight of 2 oz. If all plug-on drivers are used and need a lot of power, this should be better for heat generation.
Parts
Here are the needed parts —> Google Docs Table
You can change between the different boards in the tab menu.
Extension / Accessoires
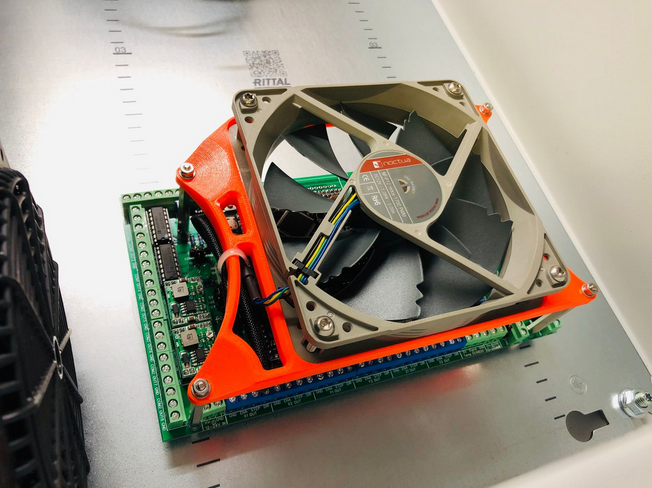
Fanmount
for a 3D-Printer. Thank to 100prznt for the design.
https://www.prusaprinters.org/prints/41531-fanmount-for-open-cnc-shield
Assembly / Soldering
The assembly instructions can be found here → assembly
Documentation
For documentation click here → documentation
Hallo Timo,
I do have a misunderstanding about all boards. I Need I believe an open cnc shield with tw nano Mega boards, a Tillboard, an Extension Panel,a wireless adapter and Panel and an Fan Mount. Is this correct and how can I order these boards with all components to it. What is the total price, please declare. Thanks for the inconvenience.
Kind Regards,
Louis
You only need an open cnc shield or a Tillboard + Tillboard Extension.
Both setups can work with a wireless set(Panel + Adapter).
The Fan mount can be printed with a 3D printer.
You can write me a mail(blog@altholtmann.com), if you dont want to procure the parts by yourself.